


Complete DTF Transfer Size & Placement Guide: Achieve Professional Results

Looking for a complete DTF transfer size guide to ensure your designs look polished and professional? You've come to the right place. At Sam's DTF Transfers, we’ve put together this detailed DTF placement guide to help you achieve consistent, high-quality results on every garment—from shirts and hoodies to caps and tote bags.
Full-front DTF transfers are the most eye-catching, so choosing the right width is critical for balance and visual appeal.
| Garment Size | Recommended Width |
|---|---|
| XS – S | 9.25 inches |
| M – L | 10 inches |
| XL | 10.8 inches |
| 2XL | 11.25 inches |
| 3XL+ | 11.5 inches |
🧥 Note for Hoodies & Long-Sleeve Sweatshirts: Add +1 inch width to front and back designs to ensure visibility on thicker garments.
Back designs offer a larger canvas for bold, creative artwork. Follow these guidelines:
| Garment Size | Recommended Width |
|---|---|
| XS – S | 10.25 inches |
| M – L | 11 inches |
| XL | 11.8 inches |
| 2XL | 12.25 inches |
| 3XL+ | 12.5 inches |
🧥 Hoodie Tip: Shift design slightly downward to avoid the hood and add +1 inch width if using on sweatshirts.
Small but impactful, pocket designs are perfect for logos, emblems, or minimal text. Use these widths based on the shirt size:
| Shirt Size | Width |
|---|---|
| S | 3 inches |
| M – L | 3.5 inches |
| XL | 3.8 inches |
| 2XL+ | 4 inches |
| Bodysuits/Toddlers | 2.5 inches |
🧥 Hoodies: Add +0.5 inch width for thicker sleeves or material.
For a subtle yet professional look, left chest designs are ideal for corporate branding or team apparel. Use these sizes:
Standard: 3.5 inches wide
Youth & Petite Sizes: 2.5–3 inches wide
Hoodies: Consider +0.5 inch width to accommodate structure
Designs on hats must be compact yet bold to maintain readability and impact.
Max Width: 3.50–3.75 inches
Max Height: 2.5 inches
💡 For best results, keep text minimal and centered. Avoid ultra-detailed artwork.
Design size depends on the surface area available and the bag’s structure.
Tote Bags: Ideal width is 6–9 inches, depending on bag size and proportions.
Duffle Bags: Recommend 5–8 inches wide, based on bag size and design height.
🎒 Tip: Measure flat areas before pressing and avoid seams or zippers for smooth adhesion.
Recommended Size: 4×2 or 4×3 inches
Ideal for: Small logos, initials, or name drops right above a left chest pocket.
Lower Left / Right: 5×5 inches
Lower Front: 4×12 inches
Lower Back: 4×12 inches
Adds a creative twist — great for boutique brands or side-tag designs.
Vertical Left or Right (Front or Back): 3×12 inches
Popular in streetwear for side text, slogans, or long icons.
Suggested Size: 4×7 or 4×6 inches
Common in teamwear, school shirts, or event tees.
Left Side / Right Side: 6×6 inches
Great for race shirts, gym tanks, or summer drops.
Right Sleeve: 3×10 inches
Left Sleeve: 3×3 (small logo) or 4×15 (full vertical)
Adds uniqueness to hoodies, long sleeves, or sportswear.
Measure Twice, Press Once: Double-check dimensions before pressing your DTF transfer.
Adjust for Garment Type:
– This guide uses unisex t-shirts as a standard.
– For hoodies or sweatshirts, increase front/back widths by +1 inch and pocket/sleeve widths by +0.5 inch.
Watch Fabric Features: Take seams, zippers, and hoods into account.
Center Like a Pro: Use rulers or placement tools for accuracy.
Consider Design Shape: Rectangles and circles may require size adjustments for visual balance.
At Sam’s DTF Transfers, we’ve helped thousands of creators get professional results with their custom apparel. But even the best design can fall short if the placement isn’t right. Here are some common mistakes we see — and how you can avoid them with confidence.
What goes wrong: Transfers pressed too close to the collar or too far down look awkward and unbalanced.
Sam’s Tip: For adult t-shirts, start your design 2.5–3 inches below the neckline. Use an alignment tool or fold your shirt vertically to find center and press with precision.
What goes wrong: Applying the same width design to a toddler tee and a 3XL hoodie results in bad proportions.
Sam’s Tip: Follow our DTF transfer size guide above to scale correctly by garment size.
→ For hoodies or long sleeves, add +1 inch width to front and back prints, and +0.5 inch to sleeve or pocket designs.
What goes wrong: Even half an inch off can make your design look crooked.
Sam’s Tip: Use your heat press plate as a reference, or grab a T-shirt alignment guide. If you're unsure, our Gang Sheet Builder allows you to visualize layout in advance.
What goes wrong: Transfers don’t adhere well to uneven surfaces and may peel over time.
Sam’s Tip: Always place designs on flat, obstruction-free zones. Avoid pressing over hoodie pouches, seams, or zip lines — shift your design slightly lower or to the side if needed.
What goes wrong: Stretchy fabrics can warp the design during wear or after washing.
Sam’s Tip: Don’t press over ribbed cuffs or high-movement zones. Stick with mid-chest, upper back, or outer sleeves for the cleanest result.
🔍 Want visual examples? Check out our Size Guide Page for charts, mockups, and layout tips — all designed to help you press like a pro.
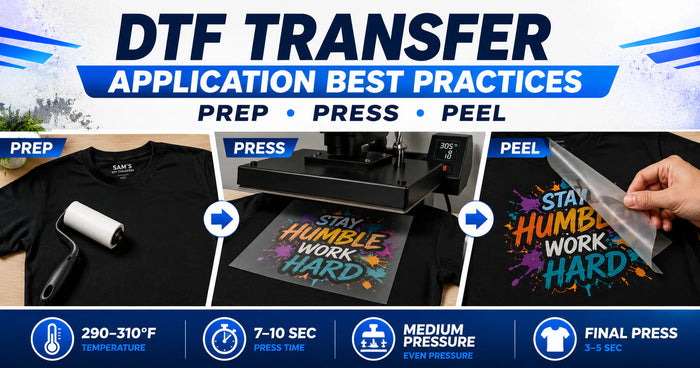
Want to see how to apply these placements in real time? Our short video shows how to size and position transfers for professional results.
We make custom printing easier with:
✅ Custom Sizes by Garment Type – Upload your design, we print it exactly to your specs
✅ Free Gang Sheet Builder – Easily create your sheet with drag & drop
✅ Fast Turnaround – Same-day printing & shipping on orders before 2 PM CST
👉 Order DTF Transfers by Size
🎨 Use Our Gang Sheet Builder
With this DTF transfer size guide and placement guide, you're fully equipped to create apparel that looks sharp, centered, and professionally printed. Whether you're designing for a brand, a sports team, or personal use—proper sizing makes all the difference.
✨ Ready to start printing like a pro?
Visit our DTF Size Guide Page or explore our Ready-to-Press Collection for your next project.
Join our newsletter for guides, new designs and shop-growth ideas — a few great reads each month.

Comments (0)
Be the first to leave a comment.
Leave a Comment